Introduction
Creating beaded bracelets is a fulfilling and creative hobby. However, knowing how to add a clasp to a beaded bracelet is essential to ensure the wearability and durability of your jewelry. The clasp is critical in securing your bracelet, adding a professional touch, and making it easy to wear. Whether you’re a beginner or an experienced jewelry maker, this guide will walk you through the process of attaching a clasp to your beaded creations.
From selecting the right type of clasp to gathering the necessary materials and tools, and finally, to the step-by-step instructions on how to add a clasp to your beaded bracelet – every detail is covered. So let’s dive into the world of jewelry making and learn how to perfectly finish your beaded bracelets.
Types of Clasps
Choosing the right clasp for your beaded bracelet is crucial to ensure ease of use and security. Let’s explore the different types of clasps available.
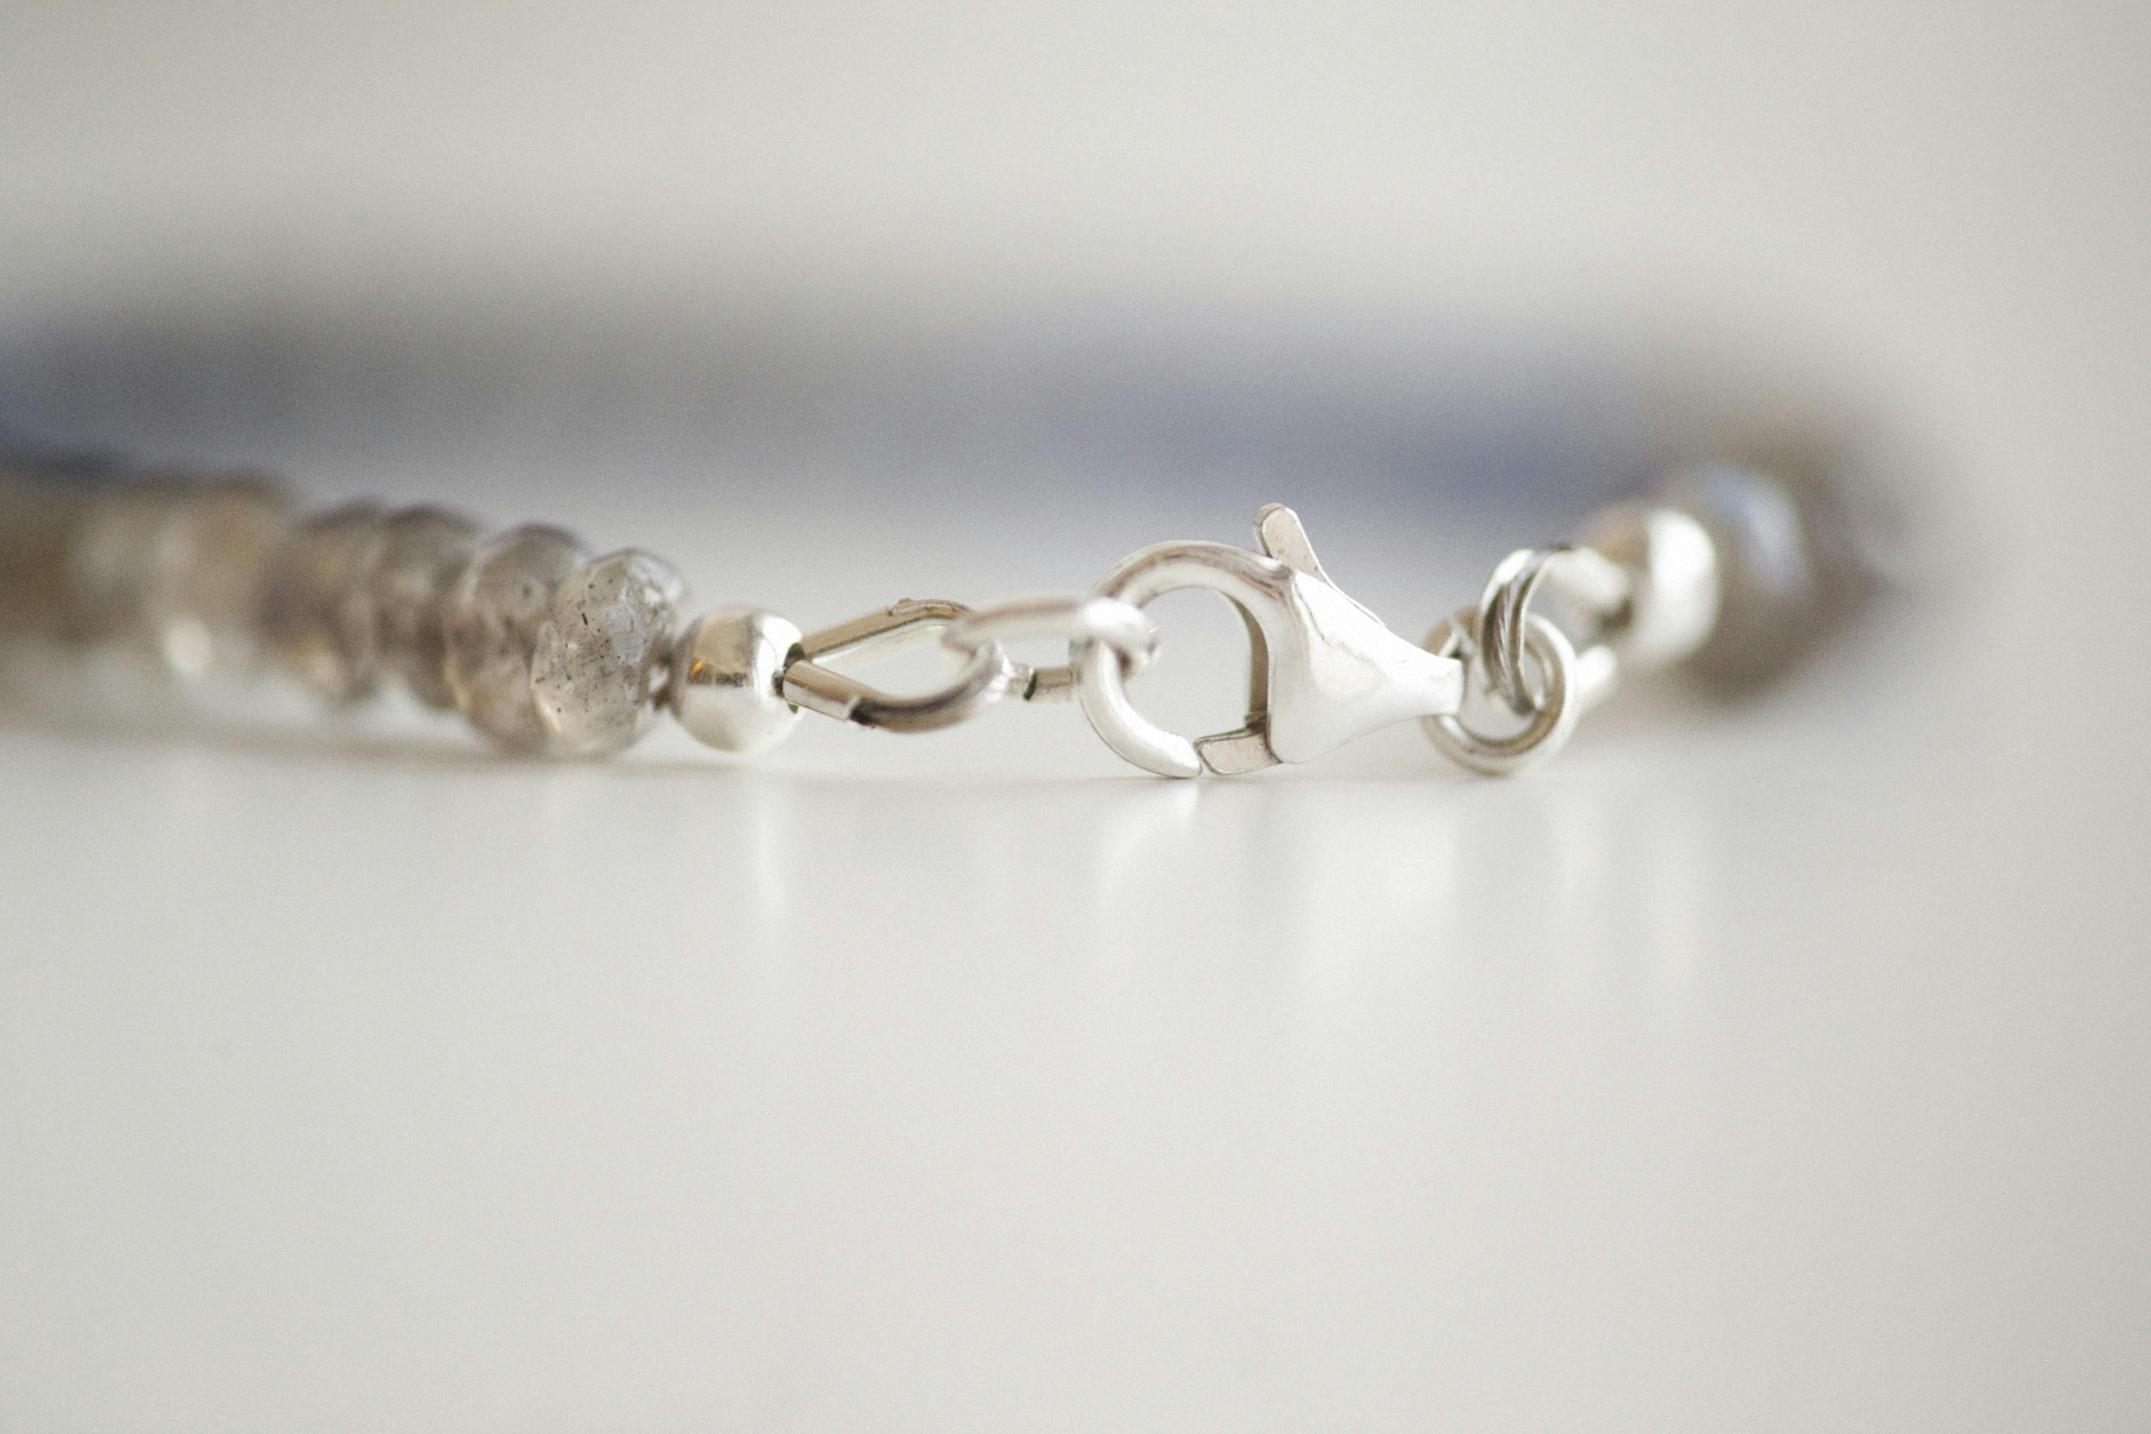
Lobster Clasp
The lobster clasp is a popular choice for beaded bracelets due to its reliability and ease of use. Shaped like a lobster’s claw, it has a small lever that opens and closes the clasp. This type is ideal for those looking for a secure and durable clasp option.
Toggle Clasp
Toggle clasps consist of a T-shaped bar that fits into a round loop. They are known for their stylish design and are easier for some people to use compared to lobster clasps. Toggle clasps are both functional and decorative, adding a touch of elegance to your bracelet.
Magnetic Clasp
Magnetic clasps are perfect for those who prefer convenience and ease. They use strong magnets to hold the bracelet ends together, making them easy to put on and take off. However, they may not be suitable for very heavy or precious beaded bracelets, as the magnets can sometimes come apart.
Materials and Tools Needed
Before you start, gather the necessary materials and tools for adding a clasp to your beaded bracelet. Having everything ready will make the process smooth and enjoyable.
Crimp Beads
Crimp beads are tiny metal beads used to secure the ends of your beading wire to the clasp. They provide a strong hold and ensure that your clasp stays in place.
Crimping Pliers
Crimping pliers are specially designed to flatten and secure crimp beads. They have two notches on the jaws, one for crimping and one for rounding off the crimp.
Wire Cutters
Wire cutters are essential for cutting the beading wire cleanly and precisely. A good pair will give you neat ends, which are necessary for a professional finish.
Beading Wire
Beading wire is the foundation of your bracelet. Choose a wire that’s strong yet flexible, usually made of stainless steel coated with nylon. The thickness of the wire should suit your beads and the clasp you’re using.
Step-by-Step Instructions for Adding a Clasp
Ready to add a clasp to your beaded bracelet? Follow these detailed steps for a successful result.
Step 1: Prepare Your Bracelet
- Measure and Cut:
- Lay out your beads in the desired pattern.
-
Cut a length of beading wire, giving yourself an extra couple of inches to work with on each end.
-
Thread Your Beads:
- Start by threading your beads onto the wire. Ensure you leave an extra inch or so of wire on each end.
Step 2: Attach the Clasp to One End
- Add a Crimp Bead:
-
Thread a crimp bead onto the wire.
-
Attach the Clasp:
-
Pass the wire through the loop or ring of the clasp, then thread it back through the crimp bead.
-
Position and Secure:
- Pull the wire tight, leaving no gaps but ensuring the beads aren’t too snug. Position the crimp bead close to the clasp.
Step 3: Crimp the Bead
- Crimping Process:
-
Use the crimping pliers’ first notch to flatten the crimp bead.
-
Round the Crimp:
- Move the crimp bead to the second notch and squeeze to round off the crimp bead, ensuring a secure and professional-looking hold.
Step 4: Finish and Secure the Other End
- Repeat the Process:
-
Add a crimp bead and the other part of the clasp to the opposite end of the bracelet. Thread the wire back through the crimp bead and into the last few beads for a secure hold.
-
Crimp and Trim:
-
Crimp the bead as before and trim any excess wire with your wire cutters for a neat finish.
-
Final Inspection:
- Ensure both ends are secure, and the clasp functions correctly.
Tips and Tricks for a Professional Finish
Achieving a professional finish takes practice and attention to detail. Here are some tips to help you perfect your technique:
- Use Quality Materials: Invest in high-quality crimp beads, pliers, and wire for durable and professional-looking results.
- Practice Crimping: Practicing crimping with spare beads and wire can help you get the hang of it before working on your actual bracelet.
- Keep Tension Even: Avoid having your beads too tight or too loose on the wire. Balanced tension ensures flexibility and a sleek look.
By following these tips, you’ll end up with a beautifully finished beaded bracelet that looks professional.
Troubleshooting Common Issues
Even the best crafters encounter issues occasionally. Here’s how to troubleshoot common clasp-related problems:
- Loose Crimp Bead: If your crimp bead is loose, it may not secure the wire properly. Ensure you’re using the correct crimping technique and the right size crimp bead for your wire.
- Wire Slips Through the Crimp Bead: Double-check that the crimp bead is firmly flattened and rounded off. Using pliers that are not specifically for crimping can cause this issue.
- Clasp Does Not Close Properly: Verify that you’re using the correct parts together and that the clasps are compatible with your beading wire’s size and type.
Conclusion
Adding a clasp to a beaded bracelet may seem daunting at first, but with the right steps and tips, you can achieve a secure and stylish closure for your handmade jewelry. Remember, practice makes perfect, so don’t be afraid to try different types of clasps and techniques to find what works best for you. Happy beading!
Frequently Asked Questions
How do I replace a broken clasp?
To replace a broken clasp, gently open the crimp beads with pliers, remove the damaged clasp, and follow the same steps for adding a new one. Ensure the new clasp is securely attached.
What’s the best type of clasp for a beaded bracelet?
The best type of clasp depends on your personal preference and the bracelet’s design. Lobster clasps and toggle clasps are popular for their security and style, while magnetic clasps offer ease of use.
How can I ensure my clasp is securely attached?
To ensure your clasp is securely attached, properly crimp your crimp beads using crimping pliers and use quality materials. Double-check that the wire is firmly secured in the crimp bead and the clasp is functioning well.